A camera teleprompter is an essential tool for anyone who wants to speak naturally and confidently on camera. It lets you read your script while maintaining direct eye contact with the lens, helping you appear relaxed and genuine to your audience.
Rather than looking down at notes or trying to memorize lines, you can stay focused on communicating your message clearly and smoothly—achieving a delivery that feels effortless yet professional.

How to choose the best teleprompter for camera?
If you’re looking for the best teleprompter for your needs, it’s important to do a bit of research first. Here are some key factors to keep in mind:
👉Compatibility: It should work seamlessly with your camera, lens, and more
Make sure the teleprompter works seamlessly with your camera, lens, and any other gear you use. It should also support the devices you plan to pair it with, such as tablets, smartphones, or computers. Some models may have specific software or device requirements, so check these before purchasing.
👉Size and portability: Consider a compact and lightweight option for mobile use
Think about how often you’ll need to move or transport your teleprompter. A smaller, lightweight option is ideal for travel or frequent setups, while a larger, heavier model is fine for stationary use in a studio.
👉Mounting options: A good camera teleprompter should offer tripod mounting, camera rig attachment, etc.
Look for a teleprompter that provides versatile mounting choices, such as tripod, camera rig, or standalone setups. Having this flexibility is crucial if you plan on using the teleprompter in different shooting environments.
👉Remote control: A teleprompter with remote control can improve recording experience
Consider whether the teleprompter includes a remote control or foot pedal for managing text scrolling. It’s an often-overlooked feature, but having easy control over the script flow can greatly improve your recording experience.
👉Ease of setup and use: Check user reviews to see how easy it is to use
Select a teleprompter that offers easy setup and operation. Complex setups can slow down your workflow and cause frustration, especially in fast-paced shoots. To gauge setup simplicity, it’s a good idea to check user reviews on the seller’s website before buying.
👉Price range: Find a balance between your budget and what you want the camera-mounted teleprompter to do
Teleprompters vary widely in price, so think about your budget and how it aligns with your production needs. In this guide, we’ll explore models that cater to a variety of price points and use cases.
Best camera teleprompter: 3 picks for different budgets
Looking for the Best Teleprompters? You’re in the right place. We’ve reviewed some of the most popular teleprompters available and compared their features, compatibility, and overall cost. Here are three models that stand out and are worth considering:
A quick list
| Model | Moman MT12 | Moman MT16 | Desview T2 |
| Glass / Size | 12″ beamsplitter | 16″ beamsplitter | About 8″ mirror |
| Typical Use-Distance | Up to 15 ft | Up to 16–17 ft | Short/medium distance |
| Build & Portability | Metal & glass; moderate weight (~1.8 kg) | Larger footprint; heavier | Very portable (340 g) |
| Ideal For | Dedicated studio, single-camera setups | Multi-camera setups, live-stream events, presenters further away | Vlogging, mobile desk setups, and interviews on the go |
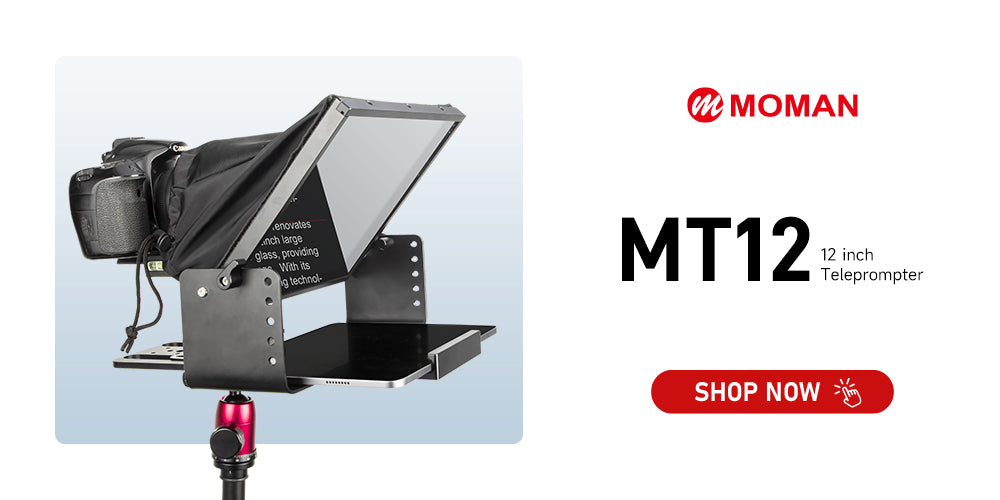
Moman MT12: Teleprompter for DSLR camera with 12’’ glass, adjustable camera brackets, under $150
💰Price: $149, with coupon code MOTE20 to save 20% ($119.20)
Overview
The Moman MT12 is a 12-inch professional-grade teleprompter that features a tempered beamsplitter glass and full-metal construction. It supports up to a 12.9-inch tablet (or smartphone) and works with DSLR/mirrorless/camcorder rigs. The MT12 offers smooth remote and app control of script scrolling. The design emphasizes ruggedness and studio capability while still being compact enough for smaller setups.
Detailed Information
🌟Compatibility: Works with DSLR, mirrorless cameras, camcorders; fits tablets up to 12.9″ and smartphones.
🌟Portability: One-piece metal & glass build: dimensions 340 × 270 × 96 mm, weight 1.8 kg.
🌟Glass/reading distance: 12-inch tempered beamsplitter glass offering up to ~15 ft reading range.
Pros
🟢Strong build quality gives durability and a professional feel.
🟢Very good reading distance and clarity, thanks to the large beamsplitter.
🟢Full support via remote and app to adjust scroll speed, text size, and more.
Cons
🔴Heavier and less portable than ultra-compact rigs, given a metal/glass build.
🔴For simple mobile or vlog setups might be overkill.
Best fit: Small-to-mid size studios, live-stream setups, configuration where you have dedicated space and want professional-level teleprompting without a huge 16″ rig.
Moman MT16: 16-inch video camera teleprompter with adjustable angle and bracket, under $200

💰Price: $199, with coupon code MOTE20 to save 20% ($159.20)
Overview
The Moman MT16 is the “step-up” in size and presence: a 16-inch ultra HD beamsplitter glass teleprompter designed for higher-end production, interviews, live-streaming, or where the presenter is seated further from the camera. It keeps the same strong metal and glass build, remote/app control, and broad compatibility as the MT12 but offers larger scale and studio presence.
Detailed Information
🌟Compatibility: DSLR/camcorder/mirrorless; supports tablets/smartphones via adjustable clamp up to ~29 cm (11.42″) width.
🌟Portability: Dimensions 345 × 340 × 85 mm; weight 1.4 kg.
🌟Glass/reading distance: 16-inch beamsplitter; 16.4 ft reading distance.
Pros
🟢Larger glass means easier reading from farther away, good for presenters who are standing further from the lens.
🟢Robust build allows for adding accessories (lights, mic mount, etc) and creates a more “studio” look.
🟢Keeps the remote/app flexibility of the MT12 but in a larger form.
Cons
🔴A larger form factor means less portability and more space required.
🔴Heavier and potentially more cumbersome to integrate into smaller rigs or mobile setups.
Best fit: Medium to large studios, multi-camera interview sets, live streaming events where the presenter isn’t right in front of the camera, or when you want a more professional teleprompter footprint.
Desview T2: Compact teleprompter for phone camera, mirrorless camera, etc., with adapter rings, under $100

💰Price: $71.20
Overview
The Desview T2 is a compact, lightweight teleprompter kit aimed at smartphones, tablets (up to ~8″), and DSLR/mirrorless cameras. It is built with portability in mind, ideal for vloggers, on-location interviews, and live streaming from smaller setups. It includes multiple lens adapter rings for flexible use and supports wide-angle lenses without vignetting.
Detailed Information
🌟Compatibility: Designed for smartphones/tablets under ~8″; supports DSLR/mirrorless camera lenses via step-up adapter rings (49/52/55/58/62/67/72/77/82 mm).
🌟Portability: Body size 213.9 × 95.0 × 170.9 mm; net weight 340g.
🌟Glass/features: 8″-ish glass (mirror size 194 × 140 mm) with 70/30 beamsplitter, supports wide-angle lens (35 mm+).
Pros
🟢Very portable and lightweight, good for mobile, run-and-gun setups.
🟢Much lower cost than big studio rigs while offering key features.
🟢Flexible lens support makes it versatile for different camera setups.
Cons
🔴Smaller glass and shorter reading distance may not be ideal for large studio setups.
🔴Tablet size limited (under ~8″), if you want to use a large 12.9″ iPad, you may be constrained.
🔴Build quality may not match the heavier metal rigs in terms of durability and stability.
Best fit: Vloggers, mobile content creators, interview on-location, livestreams from smaller cameras, anyone wanting teleprompter functionality without investing in full-studio rig.
How to use teleprompter with camera?
Setting up your teleprompter properly is key to delivering a smooth and professional on-camera performance. Proper placement, balanced lighting, and a few quick tests can greatly improve how natural and confident you appear on screen.
Pay attention to the teleprompter camera position
Begin by placing your camera at eye level to create a natural and engaging look. Mount it on a tripod so you can easily fine-tune the height, and align the teleprompter so the camera captures your face straight on. As a general guideline, position the teleprompter about 5–15 degrees below your natural eye line to help reduce eye strain during long recordings.
The camera lens should be positioned around one foot from your face and roughly six inches off-center. For the best results, maintain a distance of about 8–10 feet between you and the teleprompter. Adding small visual cues near the lens can also help you maintain consistent eye contact.
Once your teleprompter and camera are properly set, the next step is to fine-tune your framing and lighting.
Set up the camera framing and lighting
Position the camera lens in line with the center of the teleprompter glass at eye level. This alignment helps you maintain steady, natural eye contact with the audience, creating a more genuine and engaging on-camera presence. To minimize glare, avoid directing strong light onto the teleprompter glass; instead, ensure you’re evenly lit from the front.
For a professional, well-balanced look, use a three-point lighting setup consisting of a key light, fill light, and backlight. Place your lights slightly above eye level and angle them downward for a soft, flattering illumination. Layering these light sources produces depth and dimension, while checking for reflective surfaces—such as glasses or mirrors—prevents unwanted glare.
If you’re relying on natural light, try filming during golden hour or use diffusers and reflectors to soften shadows. Using a white or gray card will also help you achieve accurate color balance.
Prepare the script for easy reading in front of the camera teleprompter
When working with a video camera teleprompter, it’s important to make your script clear and easy to read:
- Use a font size between 18–22 points for comfortable visibility.
- Select high-contrast colors, such as white text on a black background, to improve readability.
- Keep your lines concise, ideally between 8 and 12 words each.
According to a study, shorter lines help reduce reading errors by 37%. It’s also helpful to use teleprompter apps that allow adjustable scrolling speeds, enabling you to sync the text flow with your natural speaking rhythm.
Control the scrolling speed to match your speaking pace
Set the teleprompter’s scrolling speed to match your natural speaking pace—most people speak comfortably at around 140–160 words per minute.
Using a wireless remote or foot pedal allows you to adjust the speed smoothly during recording without interrupting your flow. Having real-time control over scrolling speed can reduce on-air mistakes by up to 29%, helping you maintain a steady and confident delivery.
Test before you record video on camera with the teleprompter
After setting up your teleprompter, take time to run a quick test to ensure everything functions smoothly. Before starting your actual recording, do a trial run to check the script’s alignment, text clarity, and scrolling speed. This is also the perfect moment to assess your lighting and audio. If the text appears hard to read or your eye movements seem unnatural, adjust the font size, contrast, or scroll rate for better readability.
Practice is just as vital as testing. Rehearsing multiple times helps you gain confidence and refine your delivery. Begin with a simple read-through to get comfortable with the script, then move to full rehearsals focused on pacing, tone, and expression. Record a few practice takes so you can watch them back and pinpoint areas that need improvement.
Finally, review your test footage carefully. Observe your eye contact, speech flow, and overall presentation. Keep an eye out for any technical issues, such as unclear sound or soft focus, and make the necessary corrections. If you notice reflections on the teleprompter glass, adjust your lighting setup until the glare disappears.
Following these steps will help you feel fully prepared to deliver a clear, confident, and professional performance.


